Prohledejte časté dotazy
Configuring PowerChute Business Edition versions 10.0 and above for use with the Windows SNMP Agent
Issue:
Configure Windows to use PowerChute Business Edition SNMP in conjunction with Windows SNMP and SNMP Trap Services.
Product Line:
PowerChute Business Edition versions 10.0 and above
NOTE: PowerChute Business Edition versions 9.2.1 and below use the Windows SNMP service, see Configuring the Windows SNMP Agent for use with PowerChute Business Edition versions 9.2.1 and below for more details.
Environment:
All supported Windows operating systems
Cause:
Informational
Solution:
Windows SNMP Setup

Alternatively, you can directly access the Windows Features dialog box by clicking the Start button and typing “Turn Windows Features On or Off”.
PowerChute Business Edition Setup
Remove the conflicting Registry entry
Configure Windows to use PowerChute Business Edition SNMP in conjunction with Windows SNMP and SNMP Trap Services.
Product Line:
PowerChute Business Edition versions 10.0 and above
NOTE: PowerChute Business Edition versions 9.2.1 and below use the Windows SNMP service, see Configuring the Windows SNMP Agent for use with PowerChute Business Edition versions 9.2.1 and below for more details.
Environment:
All supported Windows operating systems
Cause:
Informational
Solution:
Windows SNMP Setup
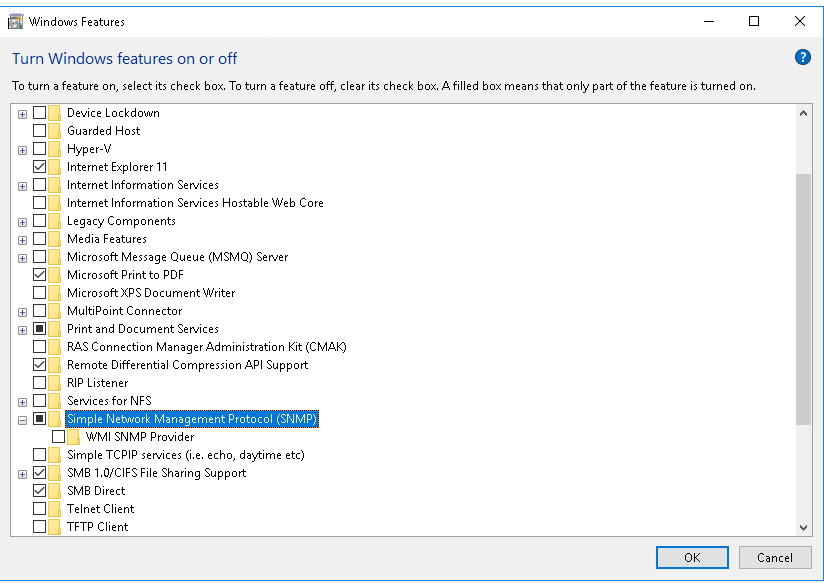
- Open “Programs and Features” by clicking the Start button, selecting “Windows System” > “Control Panel,” and then clicking “Programs and Features.” From within “Programs and Features,” select “Turn Windows Features On or Off.”:
Alternatively, you can directly access the Windows Features dialog box by clicking the Start button and typing “Turn Windows Features On or Off”.
- Scroll down and enable “Simple Network Management Protocol (SNMP)”:
PowerChute Business Edition Setup
- Install PowerChute Business Edition if necessary.
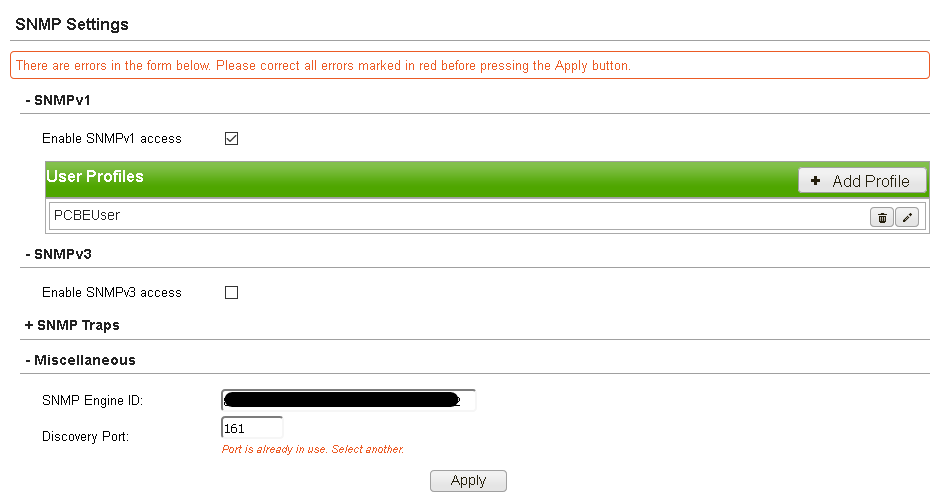
- Enable SNMP v1 and/or v3 from the SNMP Settings screen if necessary.
- In the “Miscellaneous” section, update the Discovery Port from 161 to a free port, e.g., 163 (161 and 162 are the well-known SNMP ports). You will see the error below if you do not make this change. Click Apply to save your changes.
Remove the conflicting Registry entry
- Click on the Start button, type regedit to launch the system registry editor, and delete the following registry Key:
[HKEY_LOCAL_MACHINE\SYSTEM\CurrentControlSet\Services\SNMP\Parameters\ExtensionAgents]
"1"="SOFTWARE\APC\PowerChute Business Edition\agent\snmp"
- Open Control Panel - Administrative Tools - Services and restart the PowerChute Windows Service
APC PBE Agent Service
- Restart the Windows Services
SNMP Service
SNMP Trap
- Create a new PowerChute Agent IP/Port (Port from Step 5) mapping entry in your NMS.
- Test your changes.
You should be able to send traps from the PCBE Agent to NMS (on SNMP port 162).
You should be able to query the agent from NMS on a new mapped port (e.g., 163 or your configured port in step 5).
If PowerChute Agent SNMP Traps are configured, you can test real SNMP Traps by doing a Lost Comms Test.
Publikováno pro:Schneider Electric Česká republika
Zjistěte více
Řada:

Zjistěte více
Řada:


