
DISCLAIMER
The example below is intended to demonstrate one or more features or methods and is presented as a configuration example only. Schneider Electric assumes no liability for the use or application of this example or any portion thereof.
The Advanced EcoStruxure Web Services Client driver (Advanced EWS driver) allows communications with servers that comply with EcoStruxure Web Services version 1.1, which includes ClearSCADA servers.
This article is a quick start guide showing how to connect two ClearSCADA servers and make the client machine (ClearSCADA machine that will run the Advanced EWS driver) to read both current and historic data from a particular point. For more details on how the driver works, please refer to the manual, at Help > Contents > Driver Reference > EcoStruxure Web Services Client - Advanced Driver.
First, lets check the configuration that must be done on the ClearSCADA that will act as server.
Right click on the $Root object, select "Edit Properties, go to the "EcoStruxure Web Services" tab:

Enable the Web Services and select a ClearSCADA user with rights to access the points that will be read by the other ClearSCADA machine. Save the changes.
Also, make sure WebX is running on the server machine and take note of the port in use (HTTP or HTTPS).
On the ClearSCADA machine that will be the client, let's create a few Advanced EWS driver objects, starting with an Schneider Electric EWS - Advanced > Server object:
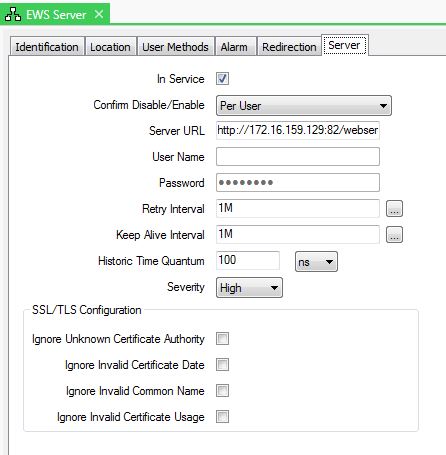
Put the object "In Service" and set the appropriate "Server URL". In this example the URL used was:
http://172.16.159.129:82/webservices/secorp
The client will communicate using HTTP to IP address 172.16.159.129, port 82, which is where the other machine's WebX server is listening.
Now let's create a Schneider Electric EWS - Advanced > Group object:

Put the object "In Service", add the Server object we just created to the "Servers" list and set suitable "Scanning Intervals" for Current Data and Historic Data. Save the changes.
Now it is time to create the first point, in this case a Schneider Electric EWS - Advanced > Analog Point object:

On the "Analog Point" tab, put the object "In Service", set "EWS Group" to the Group object we just created and browse for the "Current Data Id" and "Historic Data Id" of the point we want to read data from the server machine.

Don't forget to enable historic on the point, then save the changes.
You can check the connection status looking at the "View Status" dialog box from the Server object:

If the connection to the server machine was successful, the "State" will be "Healthy" and the driver will poll current and historic data periodically.
Historic lists for the point on the server side and on the client side should be the same:

Note: In ClearSCADA 2017 R3, ClearSCADA 2017 R2 and ClearSCADA 2017 from build version 7013 (~15th March 2019) onwards ensures no WebX licence is consumed. Previous versions of ClearSCADA may consume a WebX licence under certain circumstances which may stop users successfully connecting.
The example below is intended to demonstrate one or more features or methods and is presented as a configuration example only. Schneider Electric assumes no liability for the use or application of this example or any portion thereof.
The Advanced EcoStruxure Web Services Client driver (Advanced EWS driver) allows communications with servers that comply with EcoStruxure Web Services version 1.1, which includes ClearSCADA servers.
This article is a quick start guide showing how to connect two ClearSCADA servers and make the client machine (ClearSCADA machine that will run the Advanced EWS driver) to read both current and historic data from a particular point. For more details on how the driver works, please refer to the manual, at Help > Contents > Driver Reference > EcoStruxure Web Services Client - Advanced Driver.
First, lets check the configuration that must be done on the ClearSCADA that will act as server.
Right click on the $Root object, select "Edit Properties, go to the "EcoStruxure Web Services" tab:
Enable the Web Services and select a ClearSCADA user with rights to access the points that will be read by the other ClearSCADA machine. Save the changes.
Also, make sure WebX is running on the server machine and take note of the port in use (HTTP or HTTPS).
On the ClearSCADA machine that will be the client, let's create a few Advanced EWS driver objects, starting with an Schneider Electric EWS - Advanced > Server object:
Put the object "In Service" and set the appropriate "Server URL". In this example the URL used was:
http://172.16.159.129:82/webservices/secorp
The client will communicate using HTTP to IP address 172.16.159.129, port 82, which is where the other machine's WebX server is listening.
Now let's create a Schneider Electric EWS - Advanced > Group object:
Put the object "In Service", add the Server object we just created to the "Servers" list and set suitable "Scanning Intervals" for Current Data and Historic Data. Save the changes.
Now it is time to create the first point, in this case a Schneider Electric EWS - Advanced > Analog Point object:
On the "Analog Point" tab, put the object "In Service", set "EWS Group" to the Group object we just created and browse for the "Current Data Id" and "Historic Data Id" of the point we want to read data from the server machine.
Don't forget to enable historic on the point, then save the changes.
You can check the connection status looking at the "View Status" dialog box from the Server object:
If the connection to the server machine was successful, the "State" will be "Healthy" and the driver will poll current and historic data periodically.
Historic lists for the point on the server side and on the client side should be the same:
Note: In ClearSCADA 2017 R3, ClearSCADA 2017 R2 and ClearSCADA 2017 from build version 7013 (~15th March 2019) onwards ensures no WebX licence is consumed. Previous versions of ClearSCADA may consume a WebX licence under certain circumstances which may stop users successfully connecting.
Udgivet til:Schneider Electric Danmark
