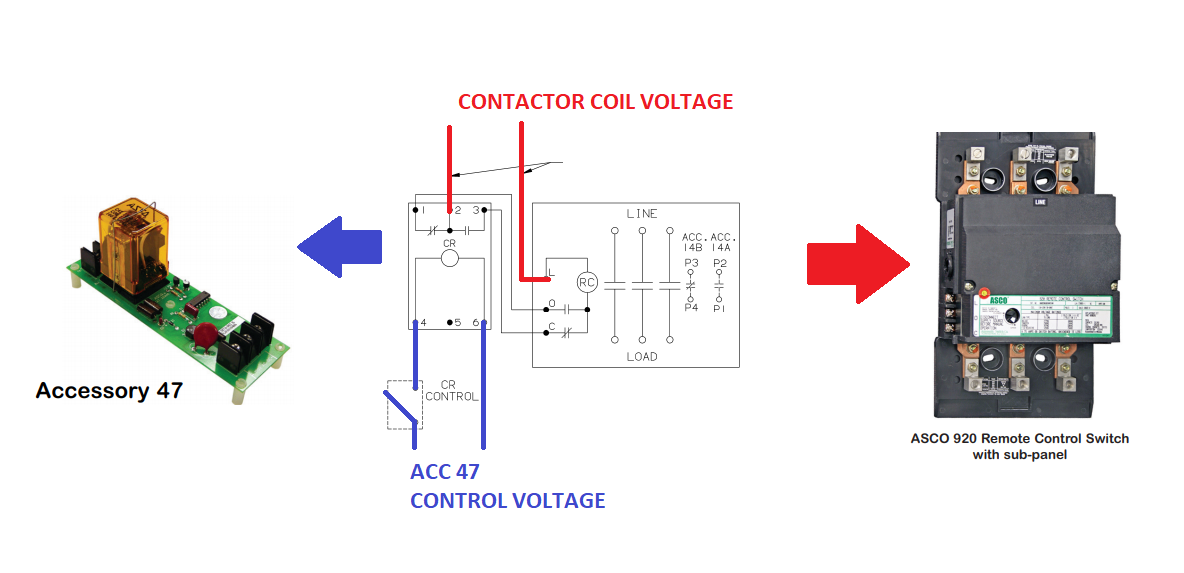
For ASCO 920 lighting contactor with accessory 47, there are two voltages that need to be considered:
First is the control voltage of the contactor coil as denoted by the voltage code on the catalog string or shown on the nameplate.

Second is the control voltage of the accessory 47 itself as denoted by the letter on the accessory code 47 suffix or shown on terminals 4 and 6 of the accessory 47 module.

These voltages may or may not be the same and depend on how they were specified at the time of the order.
Reference the following figures and steps:

Step 1
When accessory 47 is ordered from the factory, the wire from terminal 1 of the accessory 47 to terminal O of the contactor and the wire from terminal 3 of the accessory 47 to terminal C of the contactor are already connected. For field-installed accessory 47, these will have to be connected by the installer.
Step 2
The contactor coil voltage will need to be applied between terminal 2 of the accessory 47 and terminal L of the contactor. For voltage sources utilizing a hot and a neutral line, the hot line will be landed to terminal 2 of the accessory 47 and the neutral line will be landed to terminal L of the contactor.
Step 3
The accessory 47 control voltage will be applied between terminals 4 and 6. For voltage sources utilizing a hot and a neutral line, the neutral will be landed to terminal 6 and the hot line is switched going to terminal 4. The control of the contactor is then accomplished by the action of the switching device, that is, the contacts will close when the switch is closed, and the contacts open when the switch is open.
First is the control voltage of the contactor coil as denoted by the voltage code on the catalog string or shown on the nameplate.
Second is the control voltage of the accessory 47 itself as denoted by the letter on the accessory code 47 suffix or shown on terminals 4 and 6 of the accessory 47 module.
These voltages may or may not be the same and depend on how they were specified at the time of the order.
Reference the following figures and steps:
Step 1
When accessory 47 is ordered from the factory, the wire from terminal 1 of the accessory 47 to terminal O of the contactor and the wire from terminal 3 of the accessory 47 to terminal C of the contactor are already connected. For field-installed accessory 47, these will have to be connected by the installer.
Step 2
The contactor coil voltage will need to be applied between terminal 2 of the accessory 47 and terminal L of the contactor. For voltage sources utilizing a hot and a neutral line, the hot line will be landed to terminal 2 of the accessory 47 and the neutral line will be landed to terminal L of the contactor.
Step 3
The accessory 47 control voltage will be applied between terminals 4 and 6. For voltage sources utilizing a hot and a neutral line, the neutral will be landed to terminal 6 and the hot line is switched going to terminal 4. The control of the contactor is then accomplished by the action of the switching device, that is, the contacts will close when the switch is closed, and the contacts open when the switch is open.
Released for:Schneider Electric USA


