Issue
A user would like to add an OPC DA device in SPM or PME.
A user would like to add an OPC DA device in SPM or PME.
Product Line
StruxureWare Power Monitoring 7.0.x
Power Monitoring Expert 7.2.x
Power Monitoring Expert 8.x
Environment
Adding OPC DA devices to PME and SPM
Cause
Although OPC Sites can be added within Management Console OPC devices do not have a native device type and require a custom configuration.
Resolution
*Warning: Take backups of any files prior to modifying them. Ensure the backups are in a location that will not be overwritten (i.e. the Desktop).
Irreparable database damage can occur. This procedure should only be performed by users familiar with SQL Server Management Studio.
Databases should be backed up prior to performing this procedure.*
1. Name the device in the MDI. For example "OPCDevice" 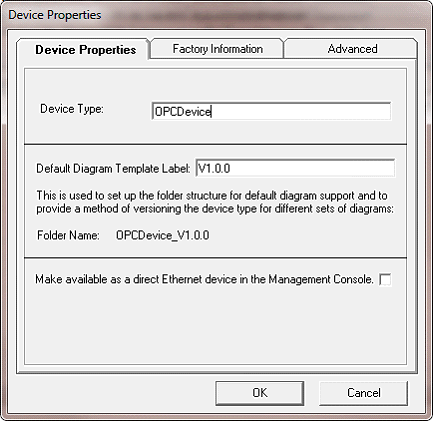
2. Add a Manager, Module, and Register. (NOTE: add as many Managers, Modules and Registers as needed to monitor all of your tags)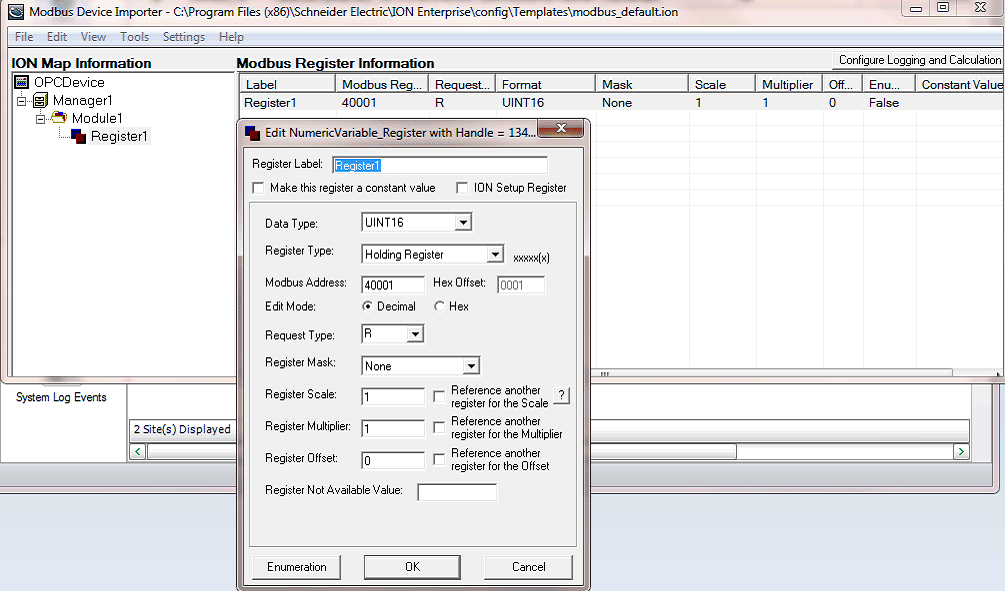
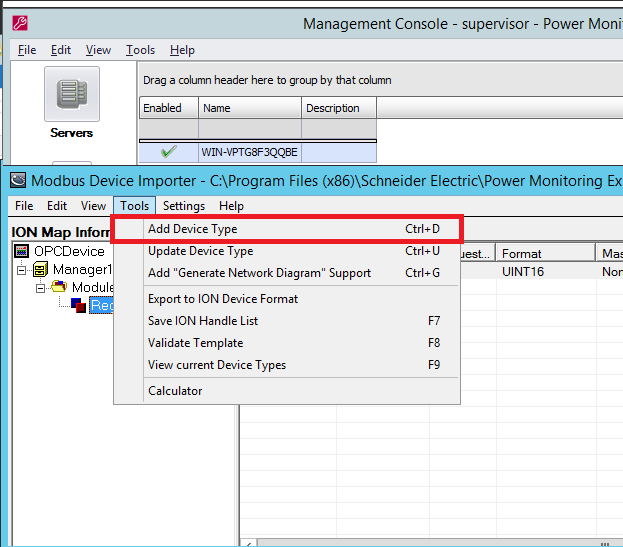
Under the tools option select "Add Device Type"
3. Save the Device in the <install path>\config\translators directory.
NOTE: In this example, the file was saved as OPCDevice.ION
After saving, go to Tools and select "Add Device Type"
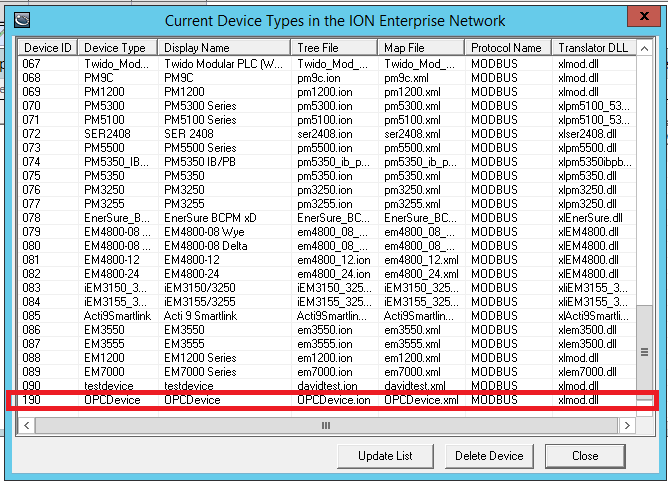
4. Navigate to that path in Windows Explorer.
(Example path was as follows: ...\Schneider Electric\Power Monitoring Expert\config\translators)
5. Open OPCDevice.ion file with Notepad or Notepad++
6. Copy the value ION Handle numbers that were added in step 2 above (In this example we only added one):
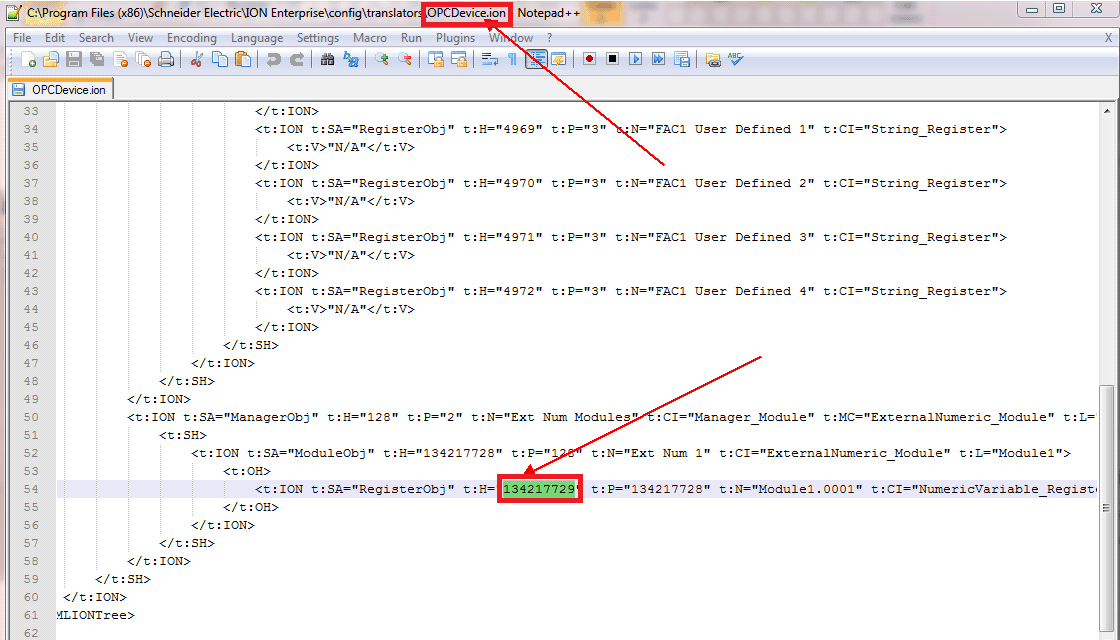
7. Close the OPCDevice.ion file.
8. Open the OPCDevice.xml file.
9. Find where the ION Handles are in the OPCDevice.xml file (ctrl+f) it should look like screen cap below. Modify the following line:
<ModbusInfo IONHandle="134217729" Name="Register1" ModbusAddress="40001" RequestType="R" Format="UINT16"/>
TO
<H ION="134217729" OPC="Channel1.Device1.IA"/>

TO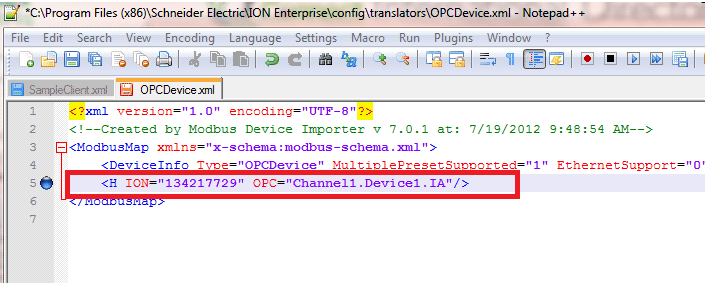
NOTE: In this example, Channel1 is the Channel/Group configured in the OPC server.
Device1 is the Device name configured in the OPC server. IA is the quantity/tag name configured in the OPC server.
This will be unique for every tag/OPC Server
10. Save and close OPCDevice.xml
11. Open SQL Management Studio.
12. Open Navigate to Databases>ION_Network>Tables, and open the dbo.DeviceType table.
13. Scroll all the way down, and locate the row with the OPCDevice recently created.
14. Change the value in Translator column to a 21 , and press Enter to save the changes
15. Close SQL Management Studio.
16. Open Management Console.
17. Add an OPC Site.
Use the following format to enter the OPC Servers address:
opcda://MACHINENAME/Server
OR
opcda://IPADDRESS/Server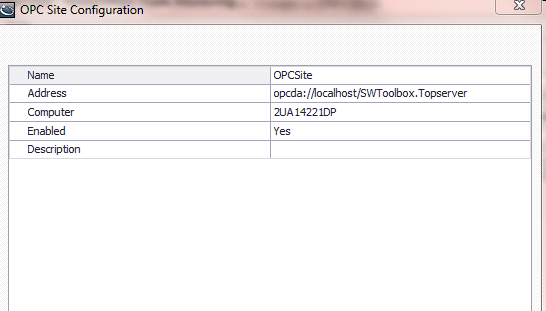
Refer to your OPC server documentation for the correct server name.
Note that this information is case sensitive.
18. Click OK.
19. Add an OPC device.
Note: Leave the Address field blank.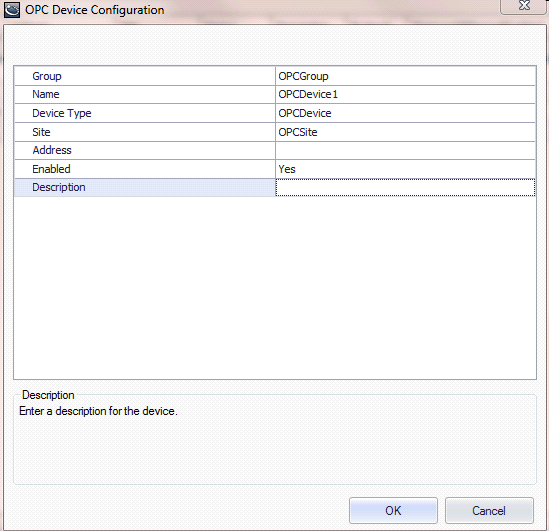
20. Click OK.
The OPC Device is now successfully added to the system with one quantity.
NOTE:
The MDI is used to generate a dummy tree w/handles for an OPC client's XML files to do its mapping, but none of the other Modbus-related features(such as logging) work for an OPC device.
Thus, logging must be configured in the VIP.
Below is a picture of the TOPServer Configuration and TOPServer Quick Client used in the above examples.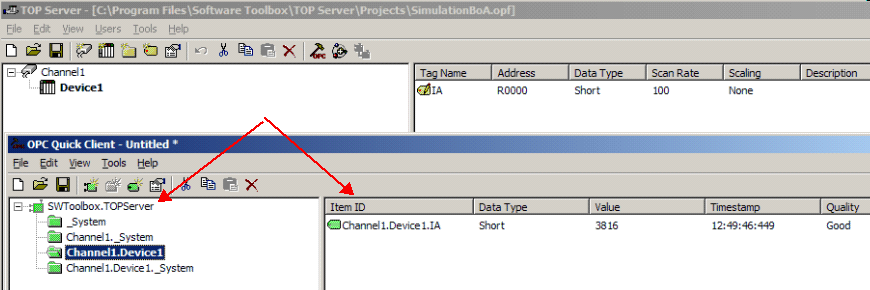
SWToolbox.TOPServer is the name of the OPC server.
Channel1 is the Channel/Group configured in the OPC server.
Device1 is the Device name configured in the OPC server.
IA is the quantity/tag name configured in the OPC server.
In order to test OPC Server connections, it is recommended to use the OPC Test Client (<install path>\system\bin\OpcTestClient.exe)
In order to verify tag readings, it is recommended to 1) link the tag to a numeric object in Vista or 2) The ION Real Time Data Test Client (<install path>\system\bin\IONServices.TestClient.exe)

2. Add a Manager, Module, and Register. (NOTE: add as many Managers, Modules and Registers as needed to monitor all of your tags)
Under the tools option select "Add Device Type"
3. Save the Device in the <install path>\config\translators directory.
NOTE: In this example, the file was saved as OPCDevice.ION
After saving, go to Tools and select "Add Device Type"
4. Navigate to that path in Windows Explorer.
(Example path was as follows: ...\Schneider Electric\Power Monitoring Expert\config\translators)
5. Open OPCDevice.ion file with Notepad or Notepad++
6. Copy the value ION Handle numbers that were added in step 2 above (In this example we only added one):
7. Close the OPCDevice.ion file.
8. Open the OPCDevice.xml file.
9. Find where the ION Handles are in the OPCDevice.xml file (ctrl+f) it should look like screen cap below. Modify the following line:
<ModbusInfo IONHandle="134217729" Name="Register1" ModbusAddress="40001" RequestType="R" Format="UINT16"/>
TO
<H ION="134217729" OPC="Channel1.Device1.IA"/>
TO
NOTE: In this example, Channel1 is the Channel/Group configured in the OPC server.
Device1 is the Device name configured in the OPC server. IA is the quantity/tag name configured in the OPC server.
This will be unique for every tag/OPC Server
10. Save and close OPCDevice.xml
11. Open SQL Management Studio.
12. Open Navigate to Databases>ION_Network>Tables, and open the dbo.DeviceType table.
13. Scroll all the way down, and locate the row with the OPCDevice recently created.
14. Change the value in Translator column to a 21 , and press Enter to save the changes
15. Close SQL Management Studio.
16. Open Management Console.
17. Add an OPC Site.
Use the following format to enter the OPC Servers address:
opcda://MACHINENAME/Server
OR
opcda://IPADDRESS/Server
Refer to your OPC server documentation for the correct server name.
Note that this information is case sensitive.
18. Click OK.
19. Add an OPC device.
Note: Leave the Address field blank.
20. Click OK.
The OPC Device is now successfully added to the system with one quantity.
NOTE:
The MDI is used to generate a dummy tree w/handles for an OPC client's XML files to do its mapping, but none of the other Modbus-related features(such as logging) work for an OPC device.
Thus, logging must be configured in the VIP.
Below is a picture of the TOPServer Configuration and TOPServer Quick Client used in the above examples.
SWToolbox.TOPServer is the name of the OPC server.
Channel1 is the Channel/Group configured in the OPC server.
Device1 is the Device name configured in the OPC server.
IA is the quantity/tag name configured in the OPC server.
In order to test OPC Server connections, it is recommended to use the OPC Test Client (<install path>\system\bin\OpcTestClient.exe)
In order to verify tag readings, it is recommended to 1) link the tag to a numeric object in Vista or 2) The ION Real Time Data Test Client (<install path>\system\bin\IONServices.TestClient.exe)
Đã phát hành cho:Schneider Electric Việt Nam


